
In today’s fast-paced world, balancing a sustainable lifestyle with the demands of working from home has become a priority. Recently, I built an off-grid solar system at my home that not only powers my work-from-home setup but also contributes to a greener environment—all built entirely by myself. In this blog, I’ll share the equipment I used, the features that stood out, the detailed energy consumption calculations, and how I integrated the system safely into my home wiring.
Why Go Off-Grid?
Working from home means being reliant on a consistent power supply. With my off-grid solar system, I’ve achieved:
Energy Independence: Reducing reliance on the grid by harnessing renewable energy.
Eco-Friendly Living: Lowering my carbon footprint and promoting sustainability.
Long-Term Savings: Cutting down on monthly electricity bills while investing in a future-proof setup.
Reliability: Even during outages, my system ensures my home office stays powered.
The Equipment That Makes It Happen
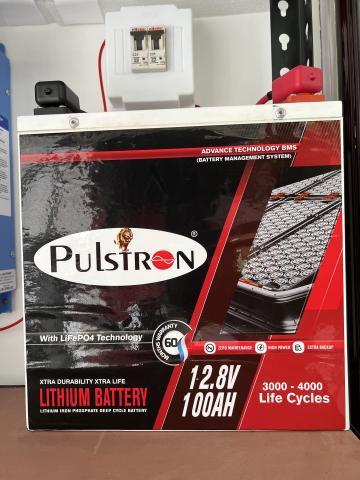
Battery: Pulstron Litor-100X
Specifications: 12V, 100Ah Lithium Inverter Battery
Key Features:
Digital Display: Keeps you informed about battery status at a glance.
Wall Mountable & 100% Waterproof: Ideal for home setups where space and durability are key.
Backup Capability: Offers performance equivalent to a 180Ah lead-acid battery.
Warranty & Compatibility: Comes with a 5-year warranty and supports any 12V inverter.
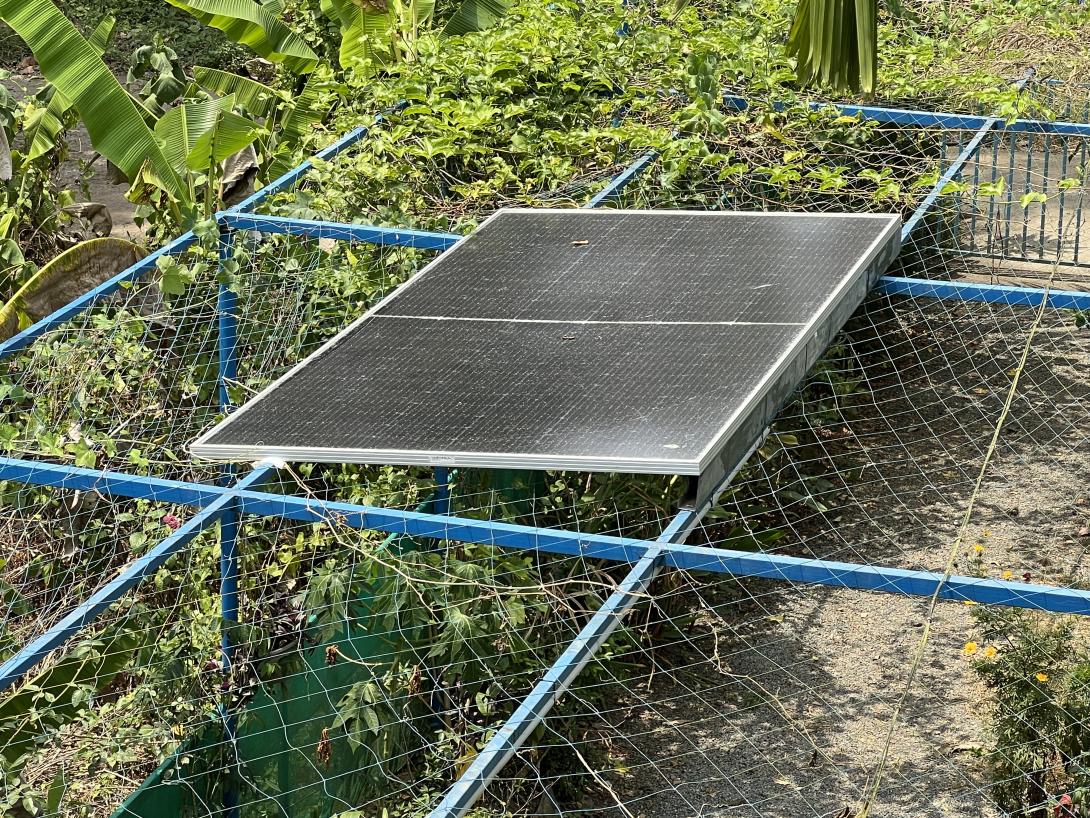
Solar Panel: Adani 535 Watts Mono Bifacial
Nameplate Specifications (STC):
Power (Pmax): 535 W (with a tolerance of 0 to +4.99 W)
Open-Circuit Voltage (Voc): ~49.7 V
Short-Circuit Current (Isc): ~13.7 A
Maximum Power Voltage (Vmp): ~41.3 V
Maximum Power Current (Imp): ~12.99 A
Efficiency: ~21%
Maximum System Voltage: 1500 V DC
Series Fuse Rating: 20 A
Performance in My Setup:
Despite a minor breakage on the glass, the panel still delivers around 350 W under optimal lighting conditions in my off-grid setup—somewhat lower than its official STC rating but still quite substantial given the damage. The bifacial design helps capture sunlight from multiple angles, improving energy production even in less-than-ideal situations.How I Acquired and Repaired It:
I originally had a 3 kW on-grid system at home. While setting up this additional panel, the glass accidentally broke, so I replaced the panel in my main system. This damaged piece ended up abandoned in my garbage area for quite some time. Eventually, I decided to give it new purpose in my off-grid project, repairing the cracked portion with transparent glue. Despite its damaged state, it continues to perform reliably and now plays a key role in powering my work-from-home lifestyle.
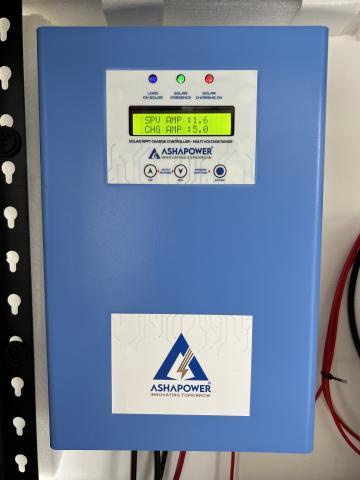
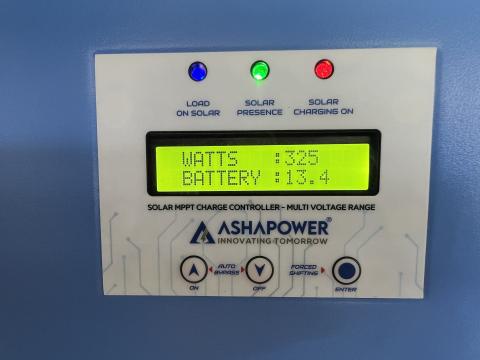
MPPT Charge Controller: ASHAPOWER NEON 50
Capabilities:
Voltage Flexibility: Compatible with 12/24/36/48V systems.
Current & Power Ratings: 50A with a maximum Voc of 165V and capable of handling up to 3800W.
Future-Proof: Installed with ample capacity for any potential future upgrades or expansions.
Purchase Here - https://amzn.in/d/6QnXMhb
Inverter: 1000 VA Capacity
Role: Converts the DC power generated by the solar panels into usable AC power for my home office.
Condition: While it’s an older model, its 1000VA capacity meets my current load requirements perfectly.
Back in 2021, I had a 1000 VA system installed. However, as our energy needs grew over the years, we upgraded to a 3000 VA capacity system. The old unit was eventually discarded.
DC Wiring: Microtek Solar DC Cable
Specifications: 6 MM cable, 20 meters long (red and black wires)
Advantages: Made of tinned copper with UV protection, ensuring both safety and durability in outdoor conditions.
Added below the wire gauge calculations
Purchase here - https://amzn.in/d/dHWDlVB
MC4 Solar Connector
Role: Ensures a secure and weather-resistant connection between the solar panels, maintaining optimal performance and reliability.
Purchase Here - https://amzn.in/d/4C6ZxPa
Safety Equipment and Updated Home Wiring
DC MCB (20 Amps): Installed to protect the DC circuit and safeguard the sensitive electronics.
AC MCB (25 Amps): Provides overcurrent protection on the AC side, ensuring safety for all connected appliances.
Home Wiring Update: I upgraded my home wiring and added dedicated AC sockets that allow me to plug my laptop directly into the off-grid power source. This integration guarantees a stable and reliable connection for my work-from-home setup—all done by myself for complete system integrity and safety.
It is available locally—just visit your nearest electrical shop.
Energy Consumption and Production Calculations
Office Laptop Consumption
My primary device in the work-from-home setup is a 70-watt office laptop. Here's a breakdown of its energy consumption based on typical usage:
| Device | Power (W) | Usage Hours | Daily Consumption (Wh) | Daily Consumption (kWh) |
|---|---|---|---|---|
| Office Laptop | 70 | 10 | 70 × 10 = 700 Wh | 0.7 kWh |
| Office Laptop | 70 | 12 | 70 × 12 = 840 Wh | 0.84 kWh |
Average Consumption: Depending on whether I work for 10 or 12 hours, my laptop uses approximately 0.7 to 0.84 kWh per day.
Off-Grid Solar System Production
The production of my off-grid system varies with the weather:
Sunny Days: Produces about 1.5 kWh per day.
Cloudy Days: Output drops to around 0.6 to 0.9 kWh per day.
Analysis
Sunny Days:
With 1.5 kWh produced on sunny days, the system not only meets the laptop’s energy needs but also provides surplus energy for other small loads or to charge the battery for later use.Cloudy Days:
On overcast days, when production is between 0.6 and 0.9 kWh, the stored battery power and safety features in the system (like the DC and AC MCBs) ensure that critical loads—such as my laptop—receive uninterrupted power.
Calculations
Wire Gauge Calculation for Solar Panel to MPPT Connection
One critical step in designing an off-grid solar system is selecting the proper DC cable gauge between your solar panels and the MPPT charge controller. The goal is to keep the voltage drop low—typically within 2–3% of the system voltage—to ensure efficient power delivery.
The Basic Formula
The voltage drop (V₍drop₎) in a DC cable can be approximated by:
V₍drop₎ = 2 × L × I × (R₍cable₎)
Where:
L is the one-way distance (in meters) between the solar panel and the MPPT,
I is the expected current (in amperes) from the panels,
R₍cable₎ is the resistance per meter of the cable (in ohms/meter),
The factor of 2 accounts for the complete circuit (going and returning).
For copper cables, a practical approximation for R₍cable₎ is:
R₍cable₎ ≈ 0.0175 / A (ohms/meter)
where A is the cross-sectional area of the cable in mm².
Example Calculation
Suppose:
L = 20 meters (one-way distance),
I = 5 A (expected current),
You choose a cable with a cross-sectional area A = 6 mm².
Plugging these values into the formula:
V₍drop₎ = 2 × 20 m × 5 A × (0.0175 / 6)
≈ 200 × 0.002917
≈ 0.583 V
For a 12V system, this drop is about 4.9%. If your system requires a lower voltage drop (ideally around 2–3%), you might consider using a cable with a larger cross-sectional area (i.e., a lower gauge number) to reduce R₍cable₎.
Adjusting for Your Needs
To fine-tune your cable selection:
Determine the maximum current (I) you expect from your solar panels.
Decide on the maximum allowable voltage drop. For sensitive electronics, keeping it within 2–3% of the system voltage is ideal.
Use the formula or an online wire gauge calculator to compare different cable sizes until you find one that meets your criteria.
This calculation helped me decide on using a 6 mm² cable for my setup, balancing performance and cost while ensuring a safe and efficient connection between the solar panel and the MPPT.
Installation Journey
Step 1: Planning and Site Preparation
I began by assessing my energy needs and mapping out the best locations for the solar panels, battery, and wiring installation. With a dedicated area for mounting the panels and proper ventilation for the battery, every detail was carefully planned.
Step 2: Mounting, Wiring, and Safety Integration
Solar Panels: Mounted securely on the roof at optimal tilt angles for maximum sun exposure.
MC4 Connection: I connected the solar panels using MC4 connectors to ensure a secure, weather-resistant connection to the rest of the system. Initially, I found the MC4 connectors a bit confusing, so I watched a couple of YouTube videos to understand the proper method and ensure the connection was done correctly.
Battery & Inverter: Installed indoors, protected from extreme weather yet accessible for regular monitoring.
DC Wiring: Routed the 6 MM cables from the panels to the MPPT controller and then to the battery bank, ensuring all connections were secure.
Safety Installations: Added a DC MCB rated at 20A and an AC MCB rated at 25A to protect against overcurrent, thereby ensuring a safe operation.
Home Wiring Upgrade: Updated the home wiring to include dedicated AC sockets for plugging in my office laptop directly from the off-grid power source, ensuring a seamless transition from solar-generated power to daily office use.
Step 3: System Testing
After completing the wiring and safety installations, I ran several tests to ensure that:
The solar panels generated the expected wattage.
The MPPT controller efficiently managed the power flow.
The battery maintained a healthy charge.
The inverter consistently delivered AC power.
The integrated AC sockets and safety MCBs functioned correctly, ensuring that my laptop and other devices received stable power.
Performance and Benefits
Since the installation, the off-grid solar system has provided a reliable power source that seamlessly supports my work-from-home lifestyle. Even on days when sunlight is limited, the system’s efficient design, backed by proper safety measures, keeps my home office running without interruption.
Key Benefits:
Steady Power Supply: Ensures no disruption during critical work hours.
Enhanced Safety: With the integration of DC and AC MCBs, the system is well-protected against overcurrent, safeguarding all connected devices.
Reduced Environmental Impact: Every watt generated by the sun is a step toward a greener planet.
Scalability: With future-proof components like the ASHAPOWER NEON 50 MPPT, the system can easily be expanded as needs grow.
Final Thoughts
Building this off-grid solar system has been a rewarding experience both technically and environmentally. By carefully calculating the energy consumption of my laptop and comparing it to the daily production of my system, I’ve ensured that my work-from-home setup is both sustainable and efficient. The added safety measures, such as the AC and DC MCBs, along with the updated home wiring and dedicated AC sockets, have taken the system to a whole new level of reliability and convenience.
For anyone working from home or looking to reduce their reliance on traditional power sources, I highly recommend considering a similar setup. The combination of modern battery technology, efficient solar panels, robust safety features, and a well-integrated home wiring system makes it a future-proof investment for sustainable living.
Feel free to reach out with any questions or share your experiences if you’ve embarked on a similar project. Together, we can create a more sustainable future—one home at a time!
Personal Journey and Reflections
This blog chronicles my journey in building an off-grid solar system to power my work-from-home setup sustainably. I detail the equipment used—from a high-performance Pulstron Litor-100X lithium battery and an Adani bifacial solar panel to an ASHAPOWER NEON 50 MPPT charge controller and a 1000 VA inverter—along with dedicated safety features like a 20A DC MCB and a 25A AC MCB. I also upgraded my home wiring to include dedicated AC sockets for my office laptop.
I break down the energy consumption of my 70-watt laptop, which uses about 0.7 to 0.84 kWh daily, and compare it to the system’s solar production of around 1.5 kWh on sunny days and 0.6 to 0.9 kWh on cloudy days. This ensures that even in variable weather, the setup remains reliable with battery storage bridging the gaps.
On a personal note, I'm a software engineer with no prior electrical or wiring expertise. I spent 4 to 5 days researching and studying to find the appropriate equipment and to learn the wiring diagrams necessary for the installation. Special thanks to ChatGPT for helping me with the calculations, particularly in determining the correct DC wire length and gauge needed for a safe and efficient setup.
Overall, this blog serves as both an instructional guide and an inspiration for anyone looking to embrace renewable energy, reduce their environmental impact, and achieve energy independence—all while enhancing a work-from-home lifestyle.
Some photos of the system


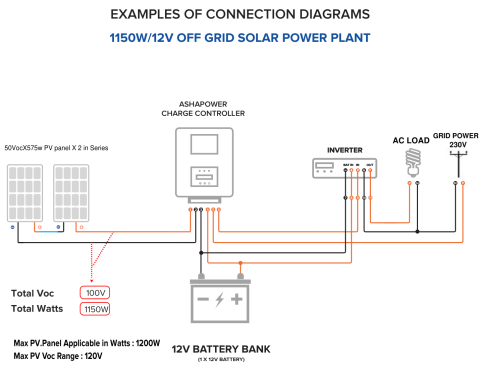
Connection Diagram
Happy solar powering!